

Baby Passport Photo
Editor & Checker

- Step 1
- Step 2
- Step 3
- Take & upload a photo
- It'll be processed & verified
- Get passport photo in 3 min.
Baby Passport Photo — Editor & Checker + Rules, Tips
- TOOL, RULES, WHERE, HOW & MORE
Taking Your Baby’s Passport Photo From Your Phone and PC — PhotoBooth Online
Store kiosks give you one or two attempts with a crying baby under fluorescent lights. PhotoBooth Online gives you unlimited attempts in your living room — then handles the technical compliance rules that cause most rejections.
Here’s exactly what happens when you use our tool, what we check, and what we guarantee.
1Take a photo at home (unlimited attempts, free)
Use Method 1 or Method 2 above. Shoot as many frames as you need — morning, afternoon, after nap. There is no charge until you approve the final result.
2Upload your best shot
Drag and drop or upload from your phone. JPEG or PNG, any modern smartphone resolution works. The background does not need to be perfect white — we replace it.
3AI processing (~60 seconds)
Our system automatically:
- Removes the background and replaces it with compliant white or off-white
- Crops the image to 2×2 inches (51×51 mm)
- Adjusts head size to 1–1⅜ inches from chin to top of head
- Checks for common issues: blur, shadows, head tilt beyond acceptable range
4Compliance verification
Every baby passport photo is reviewed against U.S. Department of State requirements before you receive the final file — including infant-specific rules (closed eyes for newborns, no visible parent hands, correct proportions).
5Download or print
Choose your delivery:
- Digital 2×2 JPEG — ready to upload or print
- 4×6 print template — six 2×2 photos on one sheet, ready for any pharmacy kiosk
- Optional printed copies shipped to your address
Total time from upload to download: about 3 minutes.
What PhotoBooth Online Checks on Every Baby Passport Photo
We verify your photo against the same rules published at travel.state.gov — including the exceptions that apply specifically to infants and newborns:
- Final size: 2×2 inches (51×51 mm)
- Head height: 1 to 1⅜ inches (25–35 mm) from bottom of chin to top of head
- Background: plain white or off-white, no objects, patterns, or other people
- Subject alone: no parent hands, arms, fingers, or shadows of adults in the frame
- Face direction: child or baby facing the camera; profile shots rejected
- Eyes: age-appropriate — closed or partially closed accepted for newborns and infants; open eyes required for toddlers and older children
- Expression: no crying, laughing, or exaggerated faces; neutral or calm expression
- Image quality: no blur, pixelation, overexposure, or red-eye
- No obstructions: no pacifier, bottle, toy, hat, or glasses in the frame
- No unauthorized digital alterations to facial features
If your photo does not pass verification, you’ll see a clear explanation of what to fix — and you can upload a new photo at no additional charge.
Acceptance Guarantee and Refund Policy
We know the real test isn’t our approval — it’s the passport acceptance agent’s approval.
PhotoBooth Online guarantees that your processed baby passport photo meets U.S. Department of State requirements. If your photo is rejected by a passport acceptance facility because it does not comply with official specifications, contact our support team with your rejection notice.
Our guarantee:
- We will reprocess your photo at no charge — or provide a full refund if we cannot deliver a compliant image
- Unlimited re-uploads until you are satisfied, before and after purchase
- No limit on how many times you can shoot and upload at home — only pay when you approve the final processed photo
What the guarantee covers: technical non-compliance (wrong size, head proportions, background, image quality) based on official U.S. passport photo rules.
What it does not cover: rejection for reasons unrelated to photo specifications (expired application, incorrect form, missing documents).
This guarantee exists because store-bought photos fail too — and charge you again for a reshoot. We built unlimited retries into the product because babies rarely cooperate on attempt one.
Upload your baby’s photo — free to try, unlimited attempts
Upload PhotoWhat Are the Baby Passport Photo Requirements by Age?
Passport photo rules depend on your baby’s age. The U.S. Department of State uses the same 2×2 inch format for all ages, but infants get official exceptions that don’t apply to toddlers or older children.
Following the age rules makes it easier to get an accepted photo the first time.
Newborn Passport Photo Requirements (0–3 Months)
At this age, your baby cannot sit up or hold their head steady — and the government knows that. Newborn passport photos are the most flexible of any age.
What baby’s passport photo must include
- 2×2 inches (51×51 mm), color, taken within the last 6 months
- Plain white or off-white background — no patterns, objects, or other people
- Only your newborn in the frame
- Face toward the camera as much as possible
- Full face visible — nothing covering cheeks, chin, or forehead
What’s allowed for newborns (not for older children)
- Eyes closed, partly closed, or open
- A slight head tilt
- Mouth slightly open
- Lying on a white or off-white sheet, shot from above
- In a car seat covered with a white sheet (seatbelt straps hidden under it)
What gets rejected
- Your hands, arms, or fingers in the frame — even if you’re supporting the head
- A parent’s face or body visible or reflected
- Shadows on the baby’s face (easy to cast when shooting from above)
- Blurry, pixelated, or dark image
- Pacifier, bottle, hat, bow, or toy in the frame
- Busy or colored background
Best approach: Lay your newborn on a white blanket on the bed. Shoot from directly above in morning window light, use burst mode, and pick a sharp frame with no hands in the shot.
Infant Passport Photo Requirements (3–12 Months)
Infants can hold their head up briefly but still can’t follow instructions. Rules stay lenient, but agents expect a clearer, sharper photo than for a newborn.
What your photo must include
- 2×2 inches, color, taken within the last 6 months
- White or off-white background, no shadows on the face
- Baby alone in the frame — no parents, siblings, or caregivers
- Face toward the camera
- Head size in the final print: 1 to 1⅜ inches (25–35 mm) from chin to top of head
What’s allowed for infants
- Eyes not fully open — partially closed is fine
- Slight head tilt
- Lying on a white sheet (shot from above) or sitting in a sheet-covered car seat
- Calm, relaxed expression — not crying or laughing
What’s stricter than for newborns
- Face more clearly toward the camera
- Sharp image — no motion blur
- No visible parental support — use the car seat or floor method, don’t hold the baby
What gets rejected
- Parent’s hands or arms in the frame (the #1 rejection reason)
- Pacifier, toy, bottle, or blanket covering part of the face
- Hats, headbands, or large bows (unless worn daily for documented religious or medical reasons, with a supporting statement)
- Glasses or sunglasses
- Shadows on the face or uneven lighting
- Wrong head size after cropping — too small or too large in the 2×2 frame
Best approach: Use the car seat method: drape a white sheet over the seat, place your baby in after feeding, hold a toy above your phone lens for eye contact, and shoot in burst mode. Take 20–30 frames and pick the best one.
Toddler Passport Photo Requirements (1–5 Years)
Starting around age one, the rules tighten. Your toddler must look at the camera with open eyes — infant exceptions no longer apply.
What your photo must include
- 2×2 inches, color, taken within the last 6 months
- White or off-white background, evenly lit, no shadows
- Child alone in the photo
- Both eyes open and visible
- Face straight at the camera — no profile or three-quarter angle
- Head size: 1 to 1⅜ inches from chin to top of head in the final print
- Neutral expression — a natural, relaxed smile with mouth closed is fine
What’s still tolerated
- A little movement — if the face is sharp and eyes are open
- Sitting instead of standing, if your child can’t stand still yet
What gets rejected
- Eyes closed, mid-blink, or looking away
- Crying, laughing, or exaggerated expressions
- Head tilted significantly to one side
- Hands in front of the face or a toy in the frame
- Glasses, hats, costumes, or clothing that looks like a uniform
- Parent behind the child with hands on shoulders — hands must not appear
Best approach: Make it a short game. Seat your child on a chair in front of a white wall. Hold a toy or sticker next to the phone lens, say “look at the toy!”, and use burst mode. Shoot in the morning after breakfast — not when they’re tired or hungry.
Child Passport Photo Requirements (6+ Years)
School-age children follow nearly the same rules as adults. No infant exceptions apply.
What your photo must include
- 2×2 inches, color, taken within the last 6 months
- Plain white or off-white background
- Face straight at the camera, head level — no tilt
- Both eyes open, visible, and looking at the camera
- Neutral expression — mouth closed, no big smile or frown
- No glasses (removed since 2016, unless medically required with a doctor’s note)
- Everyday clothes — no uniforms, costumes, or camouflage
- Head size: 1 to 1⅜ inches from chin to top of head
What gets rejected
- Glasses or sunglasses
- Hat or head covering (unless religious or medical, with a signed statement)
- Headphones, masks, or anything covering the face
- Blurry image, shadows, or non-white background
- Filters, beauty mode, or digitally altered skin tone
Best approach: Stand your child 3–4 feet from a white wall near a window. Ask them to look at a spot on the phone and hold still for three seconds. No flash. You’ll usually need fewer tries than with an infant — but the rules are stricter if eyes are closed or the expression is off.
Rules That Apply to Every Baby and Child Passport Photo
Regardless of age, every U.S. child passport photo must meet these standards:
- Size: exactly 2×2 inches (51×51 mm) in the printed version
- Color: full color, natural skin tones — no black-and-white, no filters
- Recency: taken within the last 6 months
- Background: plain white or off-white only
- Quantity for a first passport (Form DS-11): two identical printed photos submitted in person
- No digital alterations: do not use filters, beauty mode, or apps that change facial features (background replacement by a compliance tool after the photo is taken is standard practice)
- No staples: do not staple the photo to your application yourself — the acceptance agent will do this
Official source: U.S. Department of State passport photo requirements — travel.state.gov.
How to Take a Baby Passport Photo
You don’t need a studio, a special camera, or a cooperative baby. You need the right setup, the right timing, and enough attempts to get one acceptable frame.
Follow the method that matches your baby’s age and mobility. Both official methods below are accepted by the U.S. Department of State.
Method 1: White Sheet on the Floor (Best for Newborns)
When to use this: newborns and young infants who can’t sit upright.
What you need:
- A plain white or off-white crib sheet, receiving blanket, or poster board — large enough that no furniture or carpet shows in the frame
- A smartphone (rear camera, not selfie mode)
- Daylight from a window — no flash
Steps:
1Choose your timing
Shoot in the morning, 20–30 minutes after feeding. A fed, rested baby gives you the longest window of calm.
2Set up the background
Lay the white sheet flat on the floor. Smooth out wrinkles. Position it near a window so light falls evenly — not from directly behind your head (that creates your shadow on the baby).
3Place your baby
Lay your baby on their back in the center of the sheet. Remove hats, bows, and pacifiers. Dress in plain, dark-colored clothing that contrasts with the white background.
4Position yourself
Stand or kneel directly above your baby. Hold your phone 12–18 inches above their face. Check the screen: your hands and arms must not appear in the frame. If they do, move higher or use Method 2 instead.
5Get their attention
Hold a small toy or your keys directly above the phone lens (not in front of the baby’s face). Make a soft sound. You have about 3–5 seconds before they look away.
6Shoot in burst mode
Take 20–30 photos in rapid succession. Closed eyes are acceptable for newborns — pick the sharpest frame where the face is most directed toward the camera.
7Check before you leave the setup
Zoom in on your best shot. Confirm: no hands visible, no shadows on the face, face is sharp, background is plain white. If anything is off — stay put and shoot another burst. This is why home beats the store: you can retry for free.
8Upload for compliance processing
Upload your best photo to PhotoBooth Online. We replace the background with compliant white, crop to 2×2 with correct head size, and verify against U.S. passport photo rules.
Method 2: Car Seat with White Sheet (Best for Infants 3–12 Months)
When to use this: infants who can hold their head up briefly but can’t sit unassisted on a stool or stand.
What you need:
- A car seat or infant bouncer
- A white sheet large enough to drape over the seat and hang behind the baby’s head
- Safety pins or clips to hold the sheet in place (keep them out of the frame)
- Smartphone + daylight
Steps:
1Prepare the car seat
Drape the white sheet over the car seat so it covers the seat back, sides, and base. Tuck seatbelt straps under the sheet — they must not appear in the photo. The sheet should create a plain white backdrop behind and beside your baby’s head.
2Place your baby in the seat
Buckle them in normally for safety during the session, but ensure the strap across the chest is hidden under the sheet or a plain white onesie covers any visible harness in the frame.
3Position the seat
Place the car seat on a table or on the floor near a window. The baby’s face should be at your eye level when you kneel or sit in front of them.
4Light check
Face the car seat toward the window. No direct sunlight on the face (causes squinting). No overhead-only lighting (causes shadows under the eyes). Turn on a soft room light if the window side is too dark.
5Shoot from the front
Sit directly in front of the car seat, 2–3 feet away. Hold a toy above your phone lens. When your baby looks at it, shoot in burst mode.
6Review immediately
Check: no sheet wrinkles creating shadows on the face, no hands in frame, no car seat hardware visible, eyes acceptable for age (partially closed OK for infants). Shoot again if needed — you have unlimited attempts.
7Upload to PhotoBooth Online
We handle background cleanup, 2×2 cropping, and head-size verification so you don’t have to guess whether the proportions are correct.
Method 3: Chair or Wall Setup (Toddlers and Children 1+)
When to use this: children who can sit or stand with minimal support.
Steps:
1Hang a white sheet on a wall or use a blank white wall as background
2Place a stool or chair 12 inches in front of the wall — this prevents shadows between the child and the background
3Seat your child. Remove glasses, hats, food, and toys from hands
4Stand at the child’s eye level — kneel if needed
5Hold a sticker or toy directly next to the phone camera lens
6Say: “Look at the [toy] and stay still — 1, 2, 3”
7Burst mode: 10–15 shots. Pick the frame where eyes are fully open, mouth closed, and face is straight
8Upload to PhotoBooth Online for final compliance check and 2×2 formatting
After You Have the Passport Photo: Print Two Copies for Your Application
A first-time passport for a child (Form DS-11) requires two identical printed photos — not a digital file alone.
Fastest same-day path:
1Process your photo on PhotoBooth Online
2Download the 4×6 print template (includes six 2×2 photos with cut lines)
3Upload the 4×6 file to a CVS, Walgreens, or Walmart photo kiosk
4Order one 4×6 glossy print (~$0.14–$0.39)
5Cut along the lines — you now have two identical 2×2 photos
6Bring both to your passport acceptance appointment
Do not staple the photos to your application — the clerk will staple them when you submit.
Where can I take a passport photo for my baby (comparison table)
Store Baby passport photos? Format Price Appointment Accepts passport application? Walmart Photo Yes (infants, toddlers, children) In-store photo and 2×2 prints from an uploaded photo $7.64 for 2 prints Not required No Walgreens Yes (all ages, including babies) In-store photo $16.99 for 2 photos + free digital Not required No CVS Yes (babies, infants, children) In-store, Kodak Moments $17.99 for 2 photos Not required No USPS Yes — for minors under 16 In-store photo $15 (hard copy; digital sold separately) Yes Yes The UPS Store Infant policy not clearly stated In-store photo ~$19.99+ (varies by location) Optional No FedEx Office Infant policy not clearly stated In-store or online $15.95 (print or digital) Not required No Staples Yes (babies and children) In-store $19.99 prints / $21.99 digital Not required No Target (EZPrints) No baby-specific info listed Upload only → mail Not listed Online order No Costco No passport photo service Sam’s Club No passport photo service Rite Aid No passport photo service Before you go: call the store first
Corporate websites say “yes” for all ages — but individual locations sometimes refuse infants. A 2-minute phone call can save a wasted trip with a fussy baby.
Call the specific location and ask:
- Do you take passport photos for infants who can’t stand on their own?
- Can I lay my baby on a white blanket at your counter, or use a car seat?
- How many attempts do I get if the first photo doesn’t work?
- If the passport office rejects the photo, do I get a free retake?
- Is your photo technician available now, or should I come at a specific time?
What to bring
For the baby:
- White or off-white receiving blanket or crib sheet — for the counter or car seat method
- Small toy or rattle to hold above the camera lens (keep it out of the frame)
- Pacifier for waiting — remove it before the photo
- Extra onesie in case of spit-up
- Feed and burp before you leave — a fed, rested baby cooperates better
For the parent:
- Your phone with backup photos already taken at home (in case the store will print but not shoot)
- Cash or card — some UPS and USPS locations require payment at a separate counter
- Patience and a backup plan (see below)
You don’t need passport application forms just to get a photo — but at a USPS acceptance facility, bring your full DS-11 packet if you’re applying the same day.
If the store refuses or your photo is rejected
Staff may say the baby is “too small,” cite liability, or that equipment doesn’t support infants. At the passport acceptance facility, the most common rejection reasons are parent’s hands in the frame, wrong head size, shadows, or a blurry image — even when the store said the photo was fine.
- If the store refuses: ask for another nearby location. Parents report Walgreens sometimes accepts infants when CVS refused — and vice versa. Success varies by location, not brand.
- Home backup (about 10 minutes): shoot on a white sheet or car seat method, upload to PhotoBooth Online, print the 4×6 template at CVS, Walgreens, or Walmart (~$0.14–$0.39).
- Hybrid option: if the store will print but not shoot, take the photo at home and visit only for printing.
- If rejected at the passport office: you’ll need new photos. Bring two identical prints to your appointment — the clerk may prefer one of two options.
PhotoBooth Online includes unlimited home attempts and an acceptance guarantee — if your processed photo is rejected for non-compliance, contact support for a free reprocess or refund.
Official store pages — baby passport photo services
- Walmart Photo — Passport Photos
- Walgreens — Passport and Visa Photos
- CVS — Passport Photos
- USPS — Passport Appointments & Photo Services
- The UPS Store — Passport & ID Photo Services
- FedEx Office — Passport Services & Photos
- Staples — Passport & Visa Photo Services
- Target (EZPrints) — Passport Photo Upload
- Costco Photo (Shutterfly) — no passport photo service
- Sam’s Club Photo — FAQs (no passport photo service)
- Rite Aid Photo — no passport photo service
Official U.S. baby passport photo requirements and examples
The final decision on your baby’s passport photo is made by a passport acceptance agent — using the same rules published by the U.S. Department of State. Use the official sources below to verify requirements, and use our pass/fail guide to check your photo before your appointment.
Official Government Resources
- Primary source — U.S. Department of State passport photos (includes “Babies and toddlers” section with photo examples):
travel.state.gov — Passport Photos - Children’s passport application steps (Form DS-11, required documents, both parents):
travel.state.gov — Passports for Children Under 16 - Photo examples — acceptable and unacceptable (visual gallery):
travel.state.gov — Passport Photo Examples - U.S. visa photo requirements (same baby photo tips — useful if you also need a visa):
travel.state.gov — U.S. Visa Photos - Find a passport acceptance facility near you:
USPS Location Finder (filter: Passport Services) - Passport photo requirements for children — printable brochure (U.S. Embassy):
U.S. Embassy — Kids Photo Requirements Brochure (PDF)
Photos That Will Be Accepted
Use this checklist to confirm your baby’s photo passes before you submit your application.
✅Newborn lying on a white sheet, photographed from above
Eyes closed or partially open. Face directed toward camera. No hands in frame. Plain white background. Sharp focus.
✅Infant in a car seat covered with a white sheet
Sheet hides seat and straps. Baby alone in frame. Slight head tilt acceptable. Calm expression, not crying.
✅Infant with partially closed eyes
Officially acceptable for babies — the State Department states: “It is okay if a baby’s eyes are not entirely open.”
✅Toddler with a natural, relaxed smile
Both eyes open. Mouth closed or slightly closed. Facing camera directly. White background, no shadows.
✅Any age — correct head size in the 2×2 print
Head measures 1 to 1⅜ inches from chin to top of head. This is the most common technical failure — PhotoBooth Online sets this automatically.
✅Any age — even lighting, no shadows
Face lit from the front or side, not from behind. No dark patches under eyes or chin.
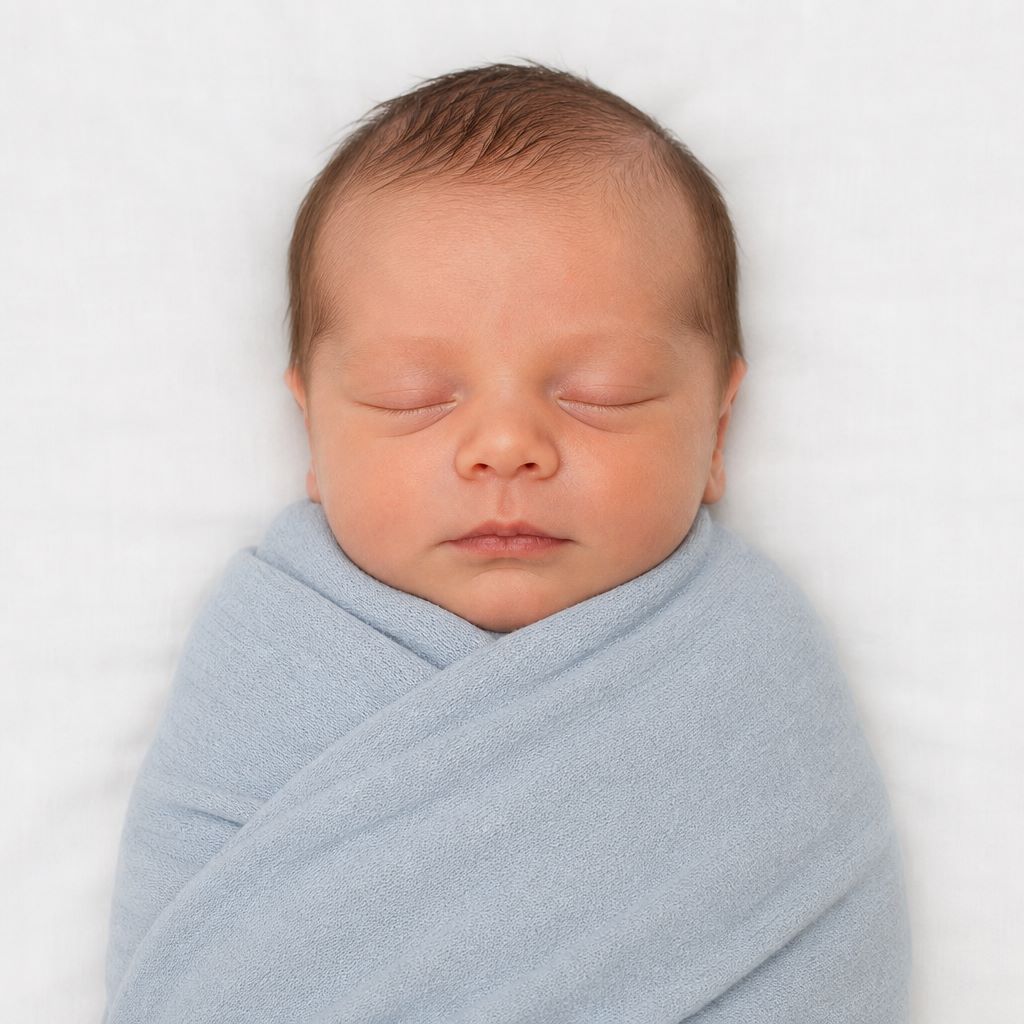
Newborn lying on a white sheet, photographed from above 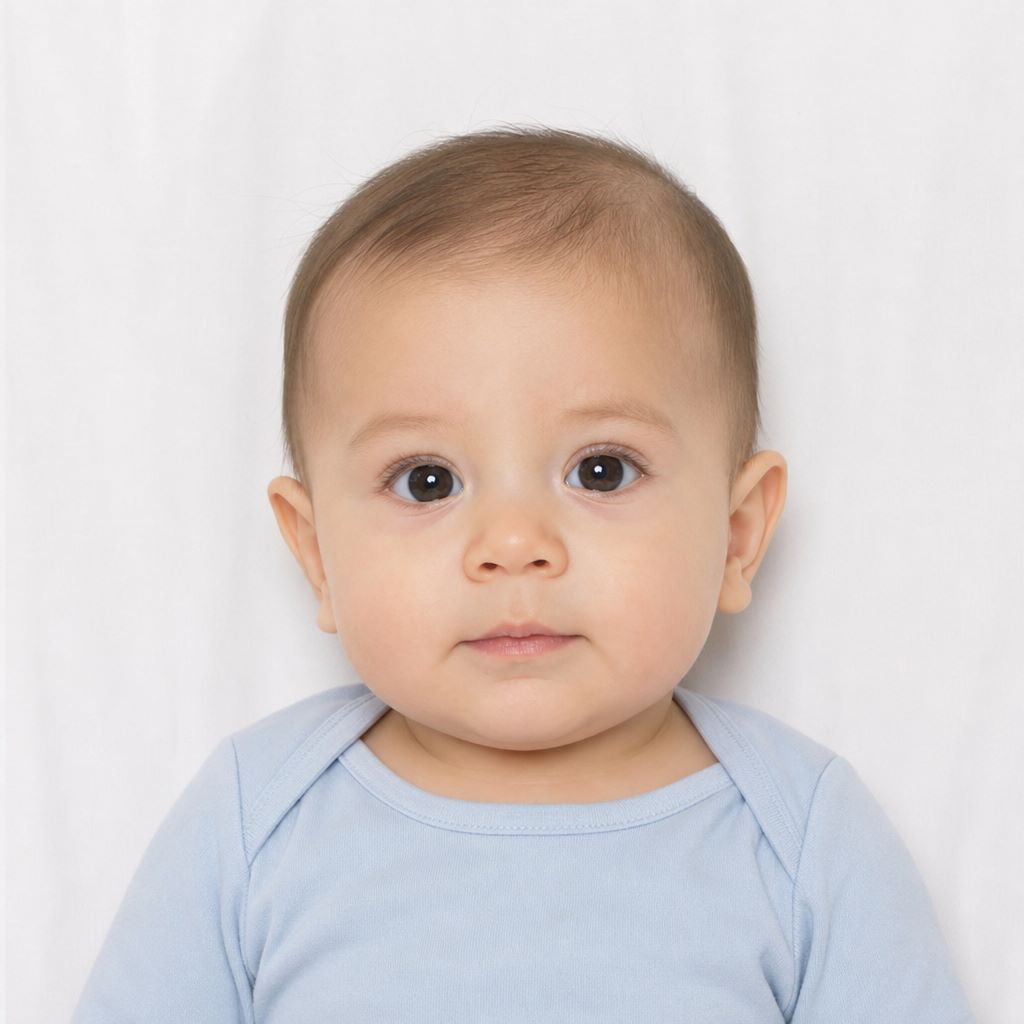
Infant in a car seat covered with a white sheet 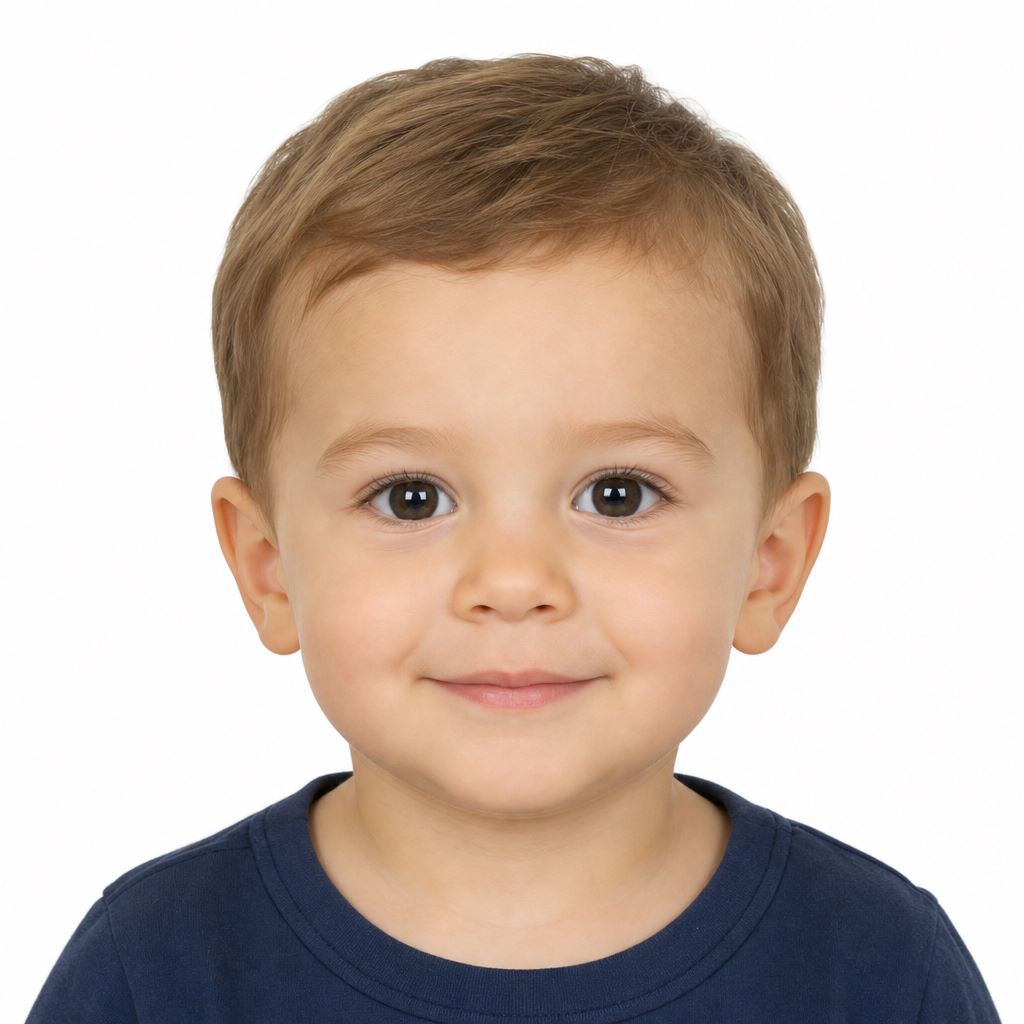
Toddler facing camera, eyes open, neutral expression Photos That Will Be Rejected
These are the rejection reasons passport acceptance agents and the State Department cite most often for baby photos.
❌Parent’s hands visible in the frame
Even if you’re supporting your baby’s head from behind — if fingers, palms, or arms appear, the photo fails. This is the #1 reason store photos get rejected at the passport office, even when the store said the photo was fine.
❌Baby not facing the camera
Profile shots, looking away, or head turned more than slightly to one side.
❌Eyes closed — for a child older than infant
Acceptable for newborns only. A 2-year-old with closed eyes will be rejected.
❌Crying, laughing, or exaggerated expression
Mouth wide open, grimacing, or mid-cry. Neutral or calm expression required.
❌Shadow on the face or background
Usually caused by shooting from above without checking your own shadow, or using overhead-only lighting.
❌Blurry or pixelated image
Motion blur from a squirming baby, or a photo zoomed in too far from a low-resolution crop.
❌Wrong head size in the 2×2 print
Head too small (too much empty space above) or too large (top of head or chin cropped). Parents cannot eyeball this — it must be measured.
❌Objects in the frame
Pacifier, bottle, toy, blanket covering part of the face, car seat straps visible, seatbelt across chest.
❌Non-white or busy background
Carpet, couch, patterned blanket, or another person visible behind the baby.
❌Glasses, hat, or costume
Glasses prohibited since 2016. Hats and costumes not allowed unless religious/medical with supporting statement.
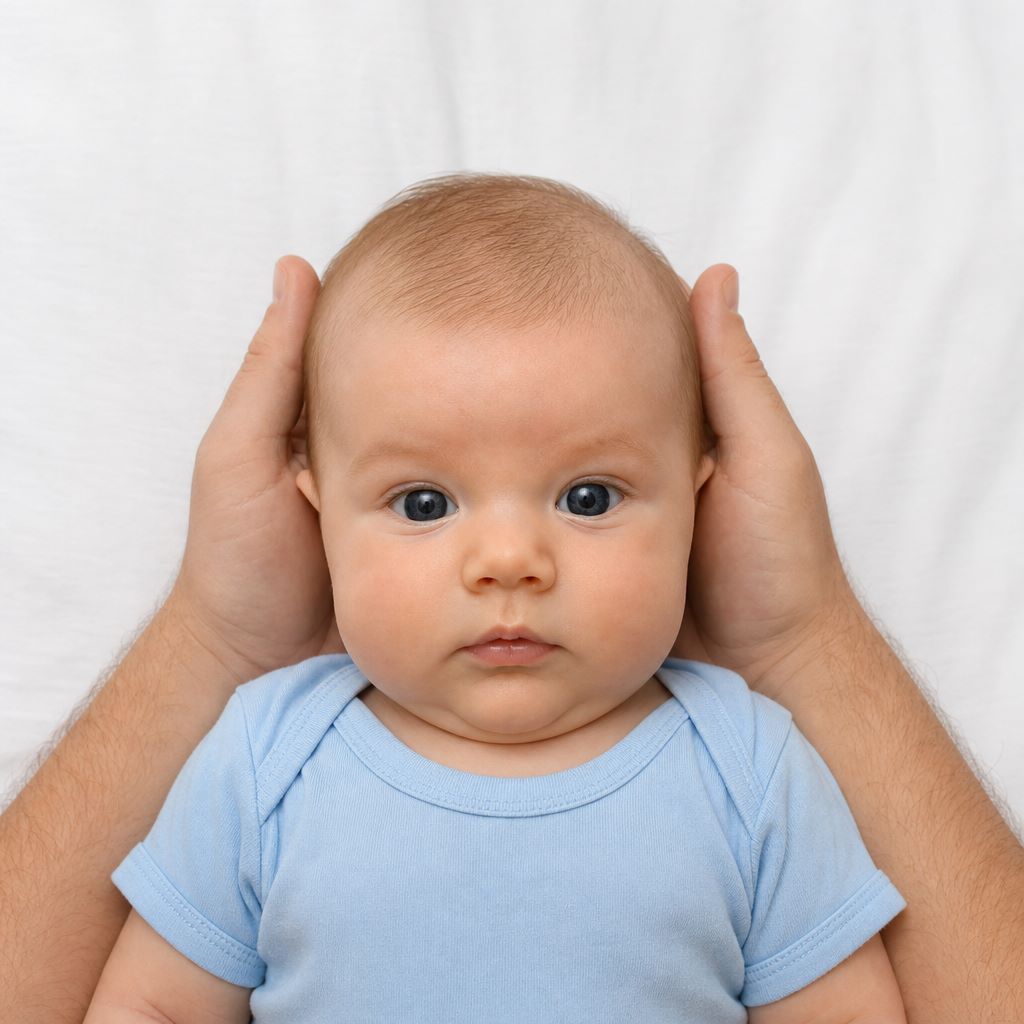
Parent’s hands visible supporting baby’s head 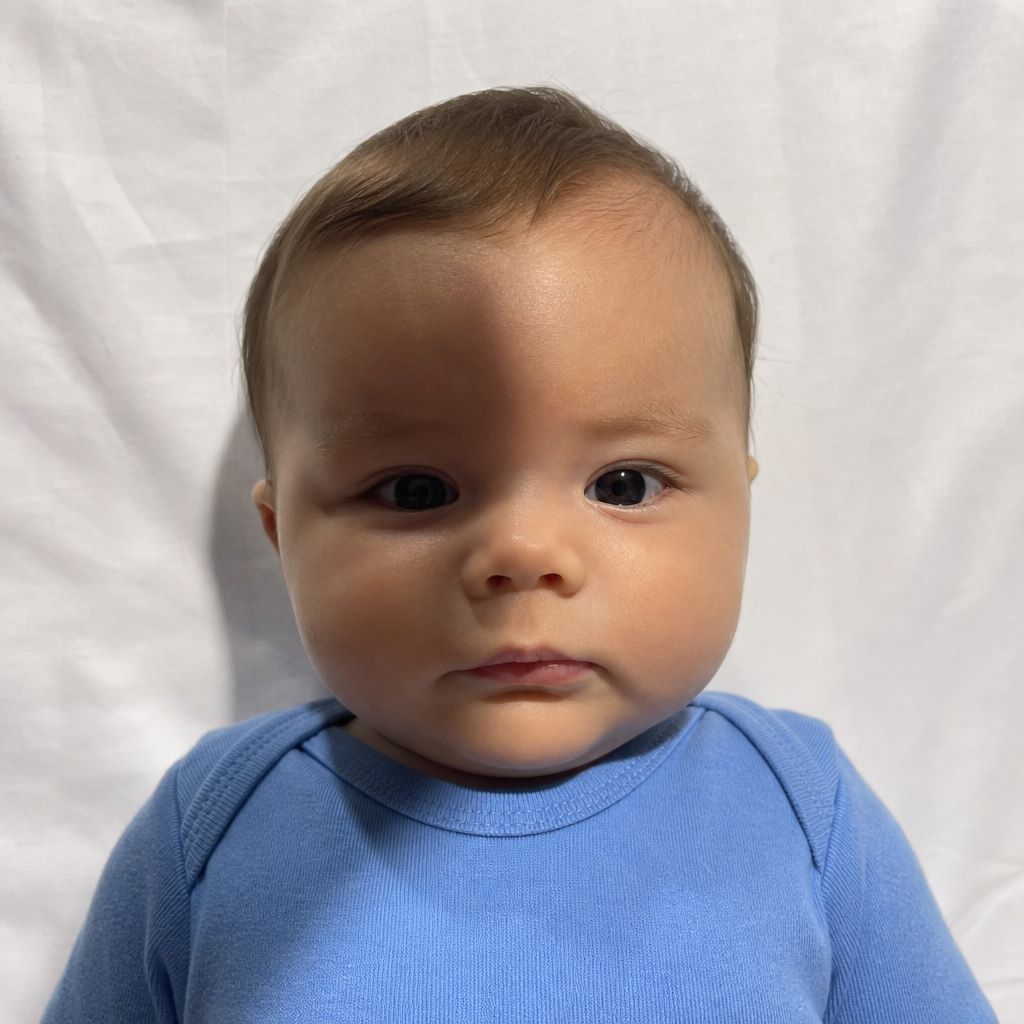
Shadow on baby’s face 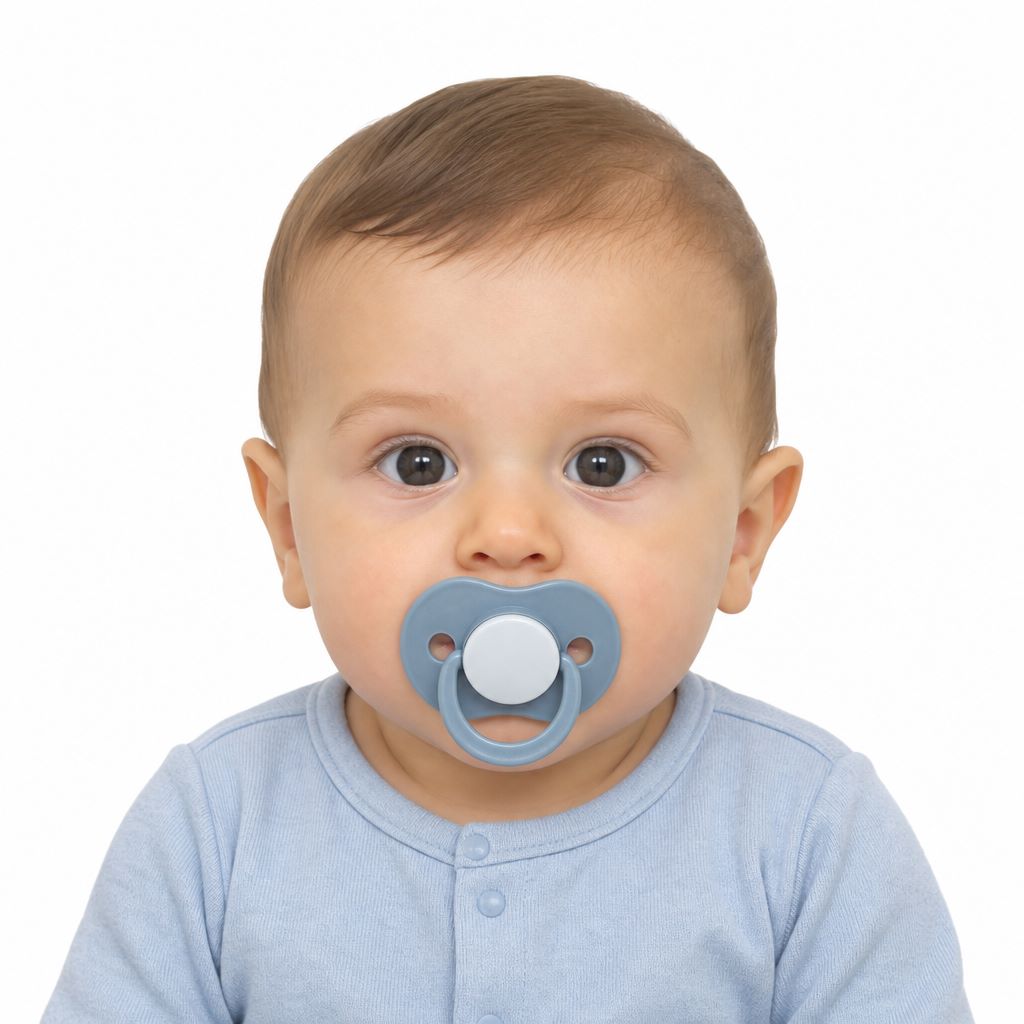
Pacifier in mouth 
Blurry or motion blur What parents say about baby passport photo taking (common reports)
After comparing hundreds of parent reports across passport forums and review sites, the same patterns appear every time:
1Babies rarely cooperate on the first or second attempt — plan for 10–30 shots, not 1–2.
2Home is less stressful than a store — you control timing, lighting, and retries.
3Store results depend on the specific employee and location, not the brand.
4Parent hands in the frame cause more rejections than closed eyes or expression.
5Taking the photo at home and printing at a store kiosk is the most reliable workflow for infants.
6Two printed photos are required for a first passport — bring both to the appointment and let the clerk pick if unsure.
7Calling ahead saves a wasted trip — especially for infants who can’t stand at a kiosk.
If you’re reading this because you’ve already had a bad store experience — you’re not alone, and you’re not doing anything wrong. Switch to the home method, take unlimited shots, and upload when you have a frame you’re confident in.
Skip the store stress — upload your baby’s photo and get a compliant 2×2 in 3 minutes
Upload PhotoThis guide covers everything you need for a U.S. baby passport photo: age-specific requirements from newborn through school age, step-by-step at-home methods (white sheet, car seat, wall setup), a store comparison (Walmart, Walgreens, CVS, USPS, and others), official pass/fail examples from the State Department, and what parents report works in practice. For infants, shooting at home with unlimited attempts — then processing with PhotoBooth Online and printing a 4×6 template at a pharmacy kiosk — is usually more reliable than a store visit.
Written by: PhotoBooth Online Editorial Team
Verified against: travel.state.gov
Updated: 07/22/2026
How to Take Baby's Passport Photo at Home
1. Make a home photo set
2. Take pictures of your baby
3. Use our tool for compliance
4. Have your child's photo printed
How Does It Work?
- STEP 1Take & upload a baby’s photo
- STEP 2Download or get delivered


US Baby Passport Photo Requirements
Size and Proportions
Your baby passport photo must be 2x2", with the head taking up 1-1.4" (top to chin). Get an infant passport picture of the correct size here and now, and these sizes will be set and checked for you–we will ensure that your picture has the exact required size.Background and Its Color
According to the official baby and infant passport photo requirements, the background should be white or off-white and cannot contain any other people or objects. Yet, when using PhotoBooth Online, you can have any backdrop—we'll replace it with a compliant white background anyway.Lighting and Shadows
Take your baby's passport photo in a room with a lot of natural daylight–such lighting helps avoid unacceptable shadows. If there are shadows anyway, try turning on some lights. Important: don't use a camera flash! It'll only upset the baby and create red eye, which is against the rules.Baby's Face and Expression
Only a neutral expression is acceptable so avoid laughing or crying. Get a baby passport photo now–we'll check it to make sure your kid has their eyes open and is looking at the camera (newborn infants can close their eyes). Finally, nothing can obscure their face (like their hands or pacifier).Clothes and Accessories
There is no strict dress code in the US baby passport photo requirements. However, it's best to dress your child in something neutral that will contrast with the white background. Any hats and accessories like bows or dummies are strictly forbidden.Other General Rules
Any toddler or infant passport photo has to meet the requirements for all ages. For example, it should be taken within the last six months and have normal colors unaltered by filters. Quality-wise, the baby's picture can't have visible pixels or printing defects.
FAQ
How to get baby passport photos at home?
If you want to take a biometric passport photo of your baby at home, you’ll need a digital camera or a smartphone, good lighting, a plain background (for example, a white wall, a bed sheet, or an off-white blanket), and a good mood. Find a comfortable time for you and your baby and follow our short tutorial.
Here’s how to take your baby’s passport photo at home:
- Dress your infants in casual clothes.
- Find a plain background due to the baby passport photo requirements
- Turn on good lighting in your room, open curtains to guarantee bright, not dark space
- Check flash light settings and adjust fast shutter speed
- Ask your child to keep a straight pose, no bending or turning, eyes open, neutral expression
- Remember to keep eyes open, smile naturally, look straight at the camera
- Take your baby’s pic for US passport application in JPEG or PNG format
- Order prints
Please don’t add any filters, effects, or digitally alter images when you take a full face newborn passport photo.How to take baby passport photos without shadow?
To take perfect photos for your baby’s passport without shadows, please find a place with good lighting. Look for a white wall, a white sheet, or hang a white blanket on a wall by reason of the photo guidelines for a baby passport. Turn on lightning. Sometimes it might be helpful to turn on the flash light on your iPhone or Android mobile camera.
Besides, don’t stand in front of the window on a sunny day. You might have issues with correct photo contrast. Stand 3 feet away from your child.
Please note that you need to keep your camera at your baby’s eyes level while taking the photo.How to get a child passport photo online?
There aren’t too many reliable passport photo services or apps on the web. Some may offer a few shots to pick from or a little number of attempts, some are quite expensive.
With us, you can take a pic of your child or of yourself as a beautiful woman passport photo or of any member of your family as well. Have a go at our tool.
