
Get Student ID Photo Now


- 134,526
- 120%
- Student ID Pictures Done
- Approval Guarantee
4 Steps to a Picture for
Your Student ID Card
1. Take a photo of yourself
2. Upload the picture here
3. Review the preview
4. Get your student ID photo
Get a Perfect Biometric Photo
- STEP 1Upload a usual picture
- STEP 2Get a ready-made photo


Student ID Photo Requirements
Background
It's best to ensure your new photograph has a non-patterned backdrop without other people or objects in it. If you create a photo for your student ID card on our website, we will remove whatever backdrop you have and replace it with a compliant plain background of light colour.Ratio and Proportions
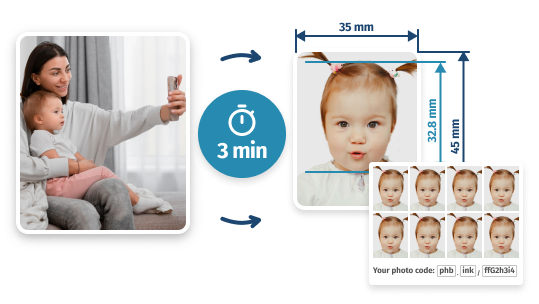
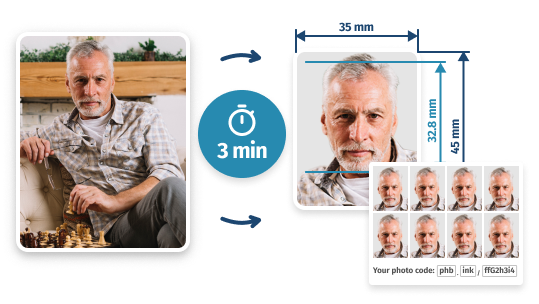
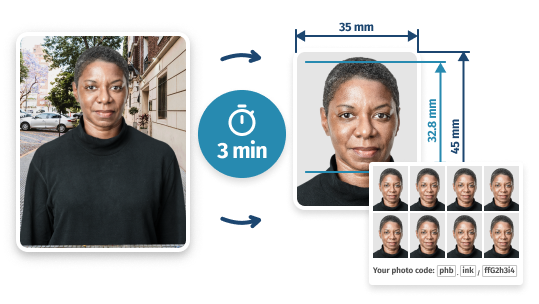
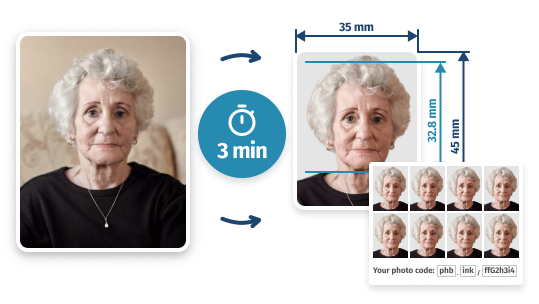
There aren't any strict requirements, but the safest bet is to make your photo 35x45 mm, with the head height between 29 and 34 mm. To get these dimensions exactly right, try our student ID photo service! It will crop your picture to this exact size and ensure all proportions are met.Facial Appearance
Keep a plain expression with your eyes open and mouth closed. Your whole face and facial features should be clearly visible and can't be obscured or covered by hair. Do not wear sunglasses or tinted glasses. If you wear simple glasses for medical reasons, avoid glare or reflection.Clothes
Pick a neutral outfit that makes a good contrast with the light-grey background. As for head coverings in your student ID card photo, they can be worn for religious reasons only in most universities. Finally, it's best to avoid wearing excessive jewellery and accessories like bands, clips or choker necklaces.Quality
The photo for your student ID card should be in colour, well-focused and clear without blur or pixelation. Also, avoid the red-eye effect (if you do have it, do not use editing tools and retake your photo). Filters are forbidden as well, even if you want to remove minor blemishes and imperfections.Other Rules
Stick to the general ID photo rules. Ensure good lighting (natural daylight should do) to eliminate any shadows on your face or the background. Also, remember that the photo for your student ID must be a true representation of you, so you should use a photo taken recently (within the last six months).
Student ID Photo:
Frequently Asked Questions
Can you smile in student ID photos?
The guidelines can vary depending on the university. Some UK institutions may allow a neutral or natural smile, while others may require a more serious expression in photos for student IDs.
More often than not, a slight smile is acceptable, but it is best to check with your school or university to understand their rules regarding the facial expressions in students’ photos. They will provide you with the necessary information to ensure your photo is suitable.How to take student ID photo?
In the UK, taking an image for your university card typically involves following certain guidelines (similar to those for other popular documents used for identification purposes). Here are some steps to help you capture a professional student photo for your university or school ID:
- Find a well-lit location with ample natural light or use a bright artificial light source. Avoid harsh shadows or overly dim areas
- Find a plain non-patterned background—opt for a neutral photo booth-like colour that provides a clear contrast to you and your clothes. You can skip this step if you’re taking your student ID photo on our website, as we will remove your background anyway
- Position your camera smartphone on a stable surface or tripod (do not use a selfie stick). Make sure you are facing forwards and look straight at the camera lens. Sit or stand straight
- Wear appropriate clothing that adheres to your institution’s rules for student ID card photos. Avoid hats or accessories that cover your face, and ensure your hair is neat and away from your face
- Position yourself in the frame so that your head and shoulders are visible. Leave some space above your head and make sure it is centred
- Keep your facial expression neutral with your mouth closed. Do not smile, frown or use any exaggerated selfie-like expressions–this is usually unacceptable in a student ID card photo
- Remove spectacles (unless they are by prescription) or headwear (unless you need to keep it because of your religion). Ensure your eyes are fully visible without any glare on the lenses
- Capture several images and choose the digital photo you like most. If you’re taking your image by yourself, review it to double-check it meets the requirements set by your institution. If you’re preparing your student ID photo in our service, see the next step
- Upload your image to our website–we will remove its background, resize it to the correct 35×45 ratio and offer you two verification options. On the photo upload page, you will be able to choose how you want to check your photograph: by AI or a human expert
Always refer to your specific school or university’s rules, as they may have their own requirements for suitable UK student ID photos. If in doubt, try reaching out to your university’s administration for clarification–they should have all information relevant to students.- Find a well-lit location with ample natural light or use a bright artificial light source. Avoid harsh shadows or overly dim areas